Monday, January 21, 2013

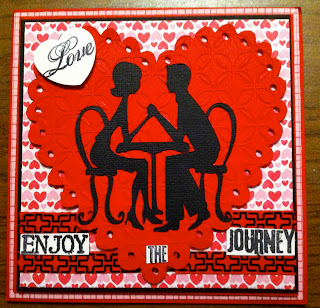
Love, Enjoy the Journey!

A Valentine's Day Card.  I'm sure it would be good for any Sweetheart occasion!

I used Sweethearts Cricut Cartridge for the heart and the couple.  I wish my sweetie and I could have time alone... perhaps in Paris!  Ah, that would be nice!

The papers are Stampin Up! and K&Co.  The stamps are Fiskars (They don't just make amazing cutting products!) and Tim Holtz.   I also used a Cuttlebug embossing folder on the heart.

Thanks for stopping by!

Saturday, January 19, 2013

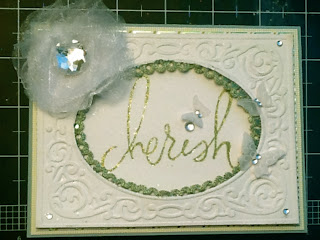
Cherish

Having fun taking out my treasures and playing.

I used a Cuttlbug folder/frame and cut out the oval and added "Cherish" stamp with glitter in a layer behind the opening.  I used DCWV and SU! papers.  I found the lollipop flower in my stash and the Sizzix butterflies that I had cut out some time ago.  It's hard to tell in the photo, but it's very sparkly.

Thanks for stopping by!

Challenge:  Daring Cardmakers: Embossability  


Thursday, January 17, 2013

Put a Cork in it!

I just couldn't resist that title!  I made this card with the Splitcoaststampers "Ways To Use It" thread in mind.  The goal:  use cork on your project.

The tree and the fence are both Sizzix dies.  The "tree" is actually a Tim Holtz holly die.  I just used the branch and added a little ink.  I added Prima flowers to the tree.  The sun face is Peachy Keen and the "Hello" is, I think, Technique Tuesday, but I'm not positive.  I smooshed a couple of green inks on the bottom, added a few layers of paper, a ribbon and a sweet little bird from Webster's Pages.  I'll be sending this little birdie flying off to a friend of mine.  It was a quick, fun card to make.


Thanks for stopping by!

Challenges: Allsorts: dies & punches
                    Make My Monday: die cuts & punches

Wednesday, January 16, 2013


I made a couple of post-it-note holders for gifts. 

You will need:

1 sheet card stock 5 1/2 x 11 inches
1 piece  5 1/2 x 5 1/2 sheet card stock
1 piece 4 x 4
2 pieces 5 1/4 x 5 1/4 pattern paper (optional)
Post it notes
Adhesive
Things to embellish with.

Score paper at 5 1/4, 5 3/4, 8 1/4
Fold along the score lines.   It will look like this.
 Add adhesive to the smaller folded section.
Add the smaller piece of card stock to this section and embellish.

 Take the 4x4 piece of cards stock and score it at 1/2 " on all sides.  The snip one piece of each corner as show.  I like to keep two side long and two sides short.   Tape on the tabs and fold in to make a box.

This one only used goodies from my stash, sorry no Cricut.  You will notice I forgot to add the post-it-note holder (box) to this one.  I went back and added it on.  I did it really early in the morning!  lol!
 This one I used a Greeting Farms image, colored with Copics and made wings for her from Martha Stewart Elegant Cakes.
These are fast, simple and cute gift ideas that can made to match any size post-it-notes you have.  Now go root through your treasures and make a couple to have on standby for quick gifts!
Tuesday, January 15, 2013

Up & Running

This one was made for another colleague.  This one broke her ankle!  She'll be off for 12 weeks!  These poor girls!

I used Old West for the horse and Gypsy Wanderings for the trees.  The papers are Prima.  The top one was misted and inked, the bottom one was just inked. 

The birds are from a Tim Holtz set.  The tiny tag was also made with my Cricut.  If you don't have a Cricut, there are other ways to make these.  I also have the Sizzix dies that I use all.  The tags are just so sweet and work great for that little word/sentiment!

Working with my current supplies/stash!

Thanks for stopping by!

Sunday, January 13, 2013

Hope You Feel Better

I made this for a girl at work who just had to undergo knee surgery.

I picked out these fun, funky papers and saw the different shapes on them.   Basic shapes!  So, I went back to my basic cart... the one I got with my Expression... Accent Essentials!  I made the circle and all of the hexagons from it.

It started out even more simply, but I couldn't help myself!  Once I got going with the hexagons, I kept going!  I like the layered hexagons.  I haven't decided if it looks like a cog or a flower, or maybe a cog flower!  lol!

The stamped image is from Pink Cat Studio and colored with copics.  Not my best coloring, but it is still good enough!  The color in the photo is not as bright as IRL.  It always seems to look good on my iPad, but then when I put it online, it doesn't seem to look as good!

The tiny tags were some that I made awhile ago.  I made a whole sheet  full of different tiny tags from a bunch of carts and cut them all out at once so I'd have a stock pile of them ready to use at my leisure.  I also gave a bunch away.  They were well received!

Thanks for stopping by!

Oh, and anyone who stopped by to see the video of all of the cards I made (over 30+!) there was a problem with my video recorder and after I spent all of the time recording it, it didn't keep!  Ugh!


Saturday, December 15, 2012

A Christmas Card

I hope you all are doing well!  Life has flipped itself upside down here and I feel like the blood is rushing to my head!  lol!  

I made this Christmas card for a family member (It's posted on the Cricut  FANatics blog).  It was quick and simple.  I used one cart:  Christmas Cheer for the sleigh and trees.  A little flock to them both and they were done.  It was a super easy card to do.  It so reminded me of days when families used to go to the woods and pick out their own trees.  I don't live close enough to the woods to do this, but I sure wish I did!


I hope to get a video up of a bunch of quick cards I made using a bunch of stickers that I have had forever!  They turned out so nice.  Since getting my Cricut, I find I rarely use them any more and hence, had a huge pile of them!  Trying to economize, reduce, reuse... blah, blah blah!  You know the story.  lol!